Photo Guide: Capture the Perfect Side Profile of Your Dog
Reading time ≈ 6 min • Last updated: 16 Jun 2025
Getting a crisp, side-profile photo is half the work when you’re ordering a custom portrait, sculpture, or keychain. Follow this practical guide—written for busy pet parents with nothing but a phone, a leash, and a pocket of treats—and give your artist the reference they need to nail every whisker.
TL;DR
- Who: Anyone planning to commission custom pet art (or just wanting Insta-worthy shots).
- What: A step-by-step method to capture a distortion-free, well-lit side profile.
- Why: Clear reference = better likeness, fewer revision rounds, faster delivery.
- Key takeaway: Shoot outdoors in shade, camera at eye level, 70–90 cm away, portrait mode OFF.
1 · Why Side Profiles Make Artists Cheer
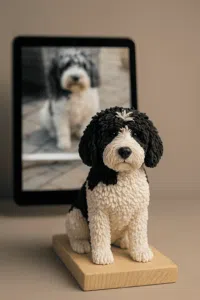
“A single, clean side view gives us ~80 % of the measurements we need.” — Frank, MY Kids lead designer
Front-on photos flatten snouts and hide ear bases. A true 90-degree profile reveals skull length, nose-stop angle, and neck line—vital cues for 3-D carving or felting.
2 · Gear & Setup Checklist
| Must-Have | Why | Quick Tip |
|---|---|---|
| Phone with 12 MP+ camera | Plenty for prints up to A3 | Clean the lens first |
| Bright but shaded area | Soft light = no harsh nose shadows | North-facing porch, tree shade |
| Non-busy background | Easier silhouette cut-out | Choose a garden wall, fence, or plain sheet |
| Treats / squeaker | Keeps head still & ears forward | Hold at eye level, 10 cm left of lens |
| Helper (optional) | Positions dog, steadies leash | Saves you from juggling |
3 · 5 Fool-Proof Steps
Step 1: Find Even Shade (0 min)
- Aim for early morning or late afternoon.
- Place dog one metre in from the sun-shade edge—bright enough for catchlights, shaded enough to avoid squints.
Step 2: Align at Eye Level (1 min)
- Kneel or crouch so your lens is level with the dog’s eye, not looking down.
- Avoid ultra-wide angles; stick to ~26–35 mm equivalent (most phone default).
Step 3: Square the Shoulders (2 min)
- Have your helper lure the dog so front and back legs are stacked (like a show-stack pose).
- Head should be at 90° to camera—no tilt.
Step 4: Focus & Expose Correctly (1 min)
- Tap the eye on-screen to lock focus.
- Slide exposure slightly down until white fur keeps detail—better to brighten later than blow highlights.
Step 5: Click & Repeat (2 min)
- Fire a burst of 5–10 shots; dogs blink.
- Change nothing but treats’ position to get ear variations.
⬇ Reference diagram (print or save to phone)

4 · Pro Tips
| Situation | Fix |
|---|---|
| Black dog “eats” detail | Place against light-grey backdrop; expose for fur, then lower highlights in edit |
| Heavy panting blur | Pause, offer water, shoot between breaths |
| Only indoor option | Face dog toward large window, lights off, curtain as backdrop |
Editing rule of thumb: Crop loose, lift shadows +10 %, add slight clarity; never over-sharpen—artists prefer natural texture.
5 · Action — Ready to Turn That Shot into Art?
- Choose your best side-profile (high-res, please!).
- Upload here → MY Kids quick uploader.
- Approve the free mock-up within 24 h.
- Receive a handmade keepsake that really looks like your pup.
No perfect photo? We offer free touch-up or guide you through retakes—just ask.
FAQ
| Q | A |
|---|---|
| My dog won’t stay still. Any hack? | Video the pose, pull the sharpest frame using your phone’s edit menu. |
| Can I send multiple angles? | Yes—send front & top too; side remains the hero shot. |
| DSLR settings? | Aperture f/4, shutter ≥ 1/500 s, ISO ≤ 400, focal 50 mm+. |
Further Resources
- Lighting basics for pet photography (Digital Photo School) → https://www.youtube.com/watch?v=U2kMjynoHO4
- Quick burst mode tutorial (iPhone/Android) → https://www.youtube.com/watch?v=1BF2xscnwko
Because every good art piece starts with a great reference—give your dog the side profile they deserve.